File Formats at a Glance
- File type: 8 bits only; JPEG or TIFF
- Color space: sRGB or Adobe RGB (1998)
- Resolution: 300 ppi
- Pixel dimensions: 300 pixels per inch of print, e.g. an 8″ x 10″ printed photo should be 2400 x 3000 pixels (8″ x 300 ppi, 10″ x 300 ppi). Please, no larger than 9000 pixels in any one dimension.
- Image mode: RGB Color
- Print profile: Visit profile download page here.
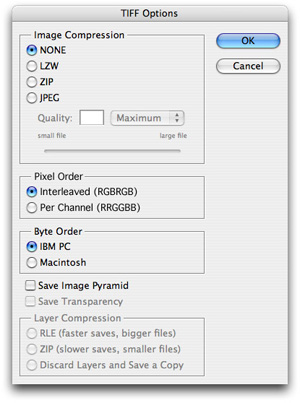
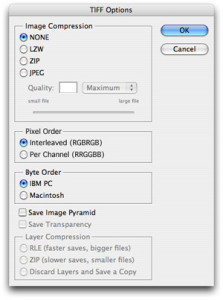
- File compression: None; LZW or Zip compression will not be processed.
How to Get the Best Results
Apples and Oranges
Making a print that mirrors the digital image you see on your computer screen is a tricky mathematical process that involves matching apples and oranges. For example, all printing software “examines” a digital image then forces it fit the print you’ve selected. But be careful. There’s a good deal of math involved. When you double a 4×6 it becomes an 8×12, so when you order an 8×10, two inches are going to be lost somewhere. Here are the four secrets of making a print that matches your image.
Automatic Center Crop
Unless otherwise specified, this is the industry’s standard cropping methodology. Center crop is applied to all prints unless you specify otherwise(see the next two choices). In this mode, we enlarge or reduce your image until it fills the print, automatically center it, and then crop off the edges. 95% of the time, this is what you want. This is also our best value.
If you wish to adjust the crop, please do so in the shopping cart in Xpress or before adding to the cart in ROES.
Print-to-Fit
Let’s say you have a group portrait with people stretching from one side of your photo to the other. If you don’t want us to crop out Uncle Harry, and you haven’t sized it exactly, this is your choice. Our software fits the longest dimension of your photo to the paper you’ve selected and lets the other dimension float. You will receive a print with a white border somewhere (top or bottom) but you won’t lose any of your image.
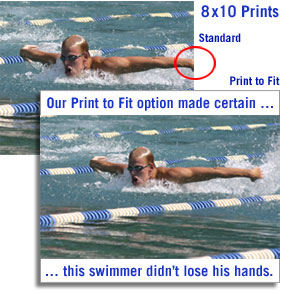
Print to fit solves the math of enlargements by fitting the longest side of your photograph to the print size you ordered and leaving the extra space on the other dimension white. In the photograph to the right, the longest dimension is the horizontal dimension so we print-to-fit the left-right and leave the bands of white on the top and bottom. A standard enlargement destroys the power of this picture by cutting off the swimmer’s hand.
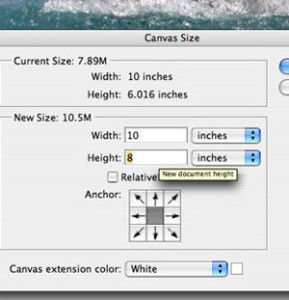
Add Canvas Area
This is a good solution if you are extremely finicky. If you want a size that’s not in our menu of options, be sure to add a canvas border while you’re editing your image in your photo editing software. Our machines see your border and print it as part of your photograph. When you get the print you can trim off the excess, or, frame it. This is a great option if have a quirky size and don’t want us to touch anything.
How Many Pixels Do I Need?
We recommend a minimum of 3,000 pixels on the longest edge of your file for most of our products. The rule of thumb is 300 pixels per inch however, we do not need files over 9,000 pixels. All files should be saved at a resolution of 300.
Here are some guidelines to optimize your prints:
![]()
![]()
While we recommend 300 dpi for optimal clarity, 200 dpi will yield excellent results. The difference in print quality isn’t noticeable to the naked eye. The difference is that a 200dpi file is 1/2 the file size, taking half the time to send to myphotopipe.com.